Virtual Networking and Linux Networking Fundamentals
Student NotesModule: Operating Systems 3 (Virtualisation & Cloud Technologies)
Topic: Virtual Networking and Linux Networking Fundamentals
Estimated Reading Time: 35 Minutes
Welcome to Week 3!
Networking is the nervous system of any virtualized infrastructure. In a traditional data center, network engineers run physical cables, configure hardware switches, and plug in routers. In a Virtualized or Cloud environment, all of this hardware is replaced by software.
As a Cloud Engineer, you are not just managing servers; you are managing the wires between them. When a VMVirtual Machine - A software-based emulation of a physical computer on ProxmoxOpen-source virtualization platform combining KVM and LXC cannot reach the internet, or when a KubernetesContainer orchestration platform podSmallest deployable unit in Kubernetes fails to talk to a database, the problem rarely lies in the physical switch. It lies in the complex web of virtual interfaces, bridges, and namespaces inside the Linux kernel.
This week is designed to bridge the gap between "clicking a button in ProxmoxOpen-source virtualization platform combining KVM and LXC" and understanding the kernel-level mechanics that make that click possible. We will dismantle the underlying abstraction and rebuild it command by command.
What You'll Learn This Week
- Linux Networking Core: Understanding the distinction between ephemeral runtime
configurations (
ip) and persistent system configurations (nmcli). - Virtual Wiring: How
vethpairs replace physical patch cables. - Virtual Switching: How Linux Bridges simulate Layer 2 switches and manage MAC address tables.
- Network Isolation: Using Namespaces to solve the "Multi-TenantGrouping of users and resources (also called Project)" problem.
- Advanced Operations: Implementing redundancy (Bonding), Routing, and Security (Firewalls).
- Software Defined Networking: An introduction to Open vSwitch (OVS).
- ProxmoxOpen-source virtualization platform combining KVM and LXC and LXCLinux Containers - OS-level virtualization Implementation: Applying these concepts to real-world VMVirtual Machine - A software-based emulation of a physical computer networking modes.
Part 1: Linux Networking Fundamentals
ProxmoxOpen-source virtualization platform combining KVM and LXC is, at its core, a Debian Linux operating system. To troubleshoot or configure it effectively, you must master Linux networking.
1. Runtime vs. Persistent Networking
(ip vs nmcli)
In the early days of Unix, network interfaces were configured using ifconfig. This tool has
been deprecated for over a decade because it cannot handle modern complexities like multiple IP
addresses per interface or policy-based routing. Today, we rely on two distinct layers of configuration.
1.1 The Kernel Layer: ip (Runtime)
Netlink Sockets (The Communication Bridge)
This is the most technical part. Usually, when a program wants to talk to the Linux Kernel, it uses
"System Calls." However, the network stack is so complex that it needs a more flexible "conversation."
Netlink is a special Inter-Process Communication (IPC) mechanism. Think of it as a high-speed data bus
between "User Space" (where you type commands) and "Kernel Space" (where the hardware is controlled).
Unlike older tools that had to "read" files in /proc to see what was happening,
ip sends a message over a Netlink socket, and the Kernel responds instantly.
Modifying the "In-Memory State" (The Impact)
When you run a command like sudo ip addr add 192.168.1.50/24 dev eth0, you are not writing
to a configuration file on the hard drive. Instead:
- Direct Injection: You are telling the Kernel to update its active, running memory immediately.
- Instant Effect: The change happens the millisecond you hit Enter.
- The "Reboot" Trap: Because you modified the in-memory state and not a file (like
/etc/network/interfaces), the changes are volatile. If you reboot your Dell M1000 blade, the Kernel wipes its memory, and those IP settings are gone unless they are backed up in a config file.
Key Commands:
- Link Status:
ip link show(Displays MTU, MAC addresses, and UP/DOWN state). - IP Addresses:
ip addr show(Displays IPv4/IPv6 addresses attached to links). - Routing Table:
ip route get 8.8.8.8(Simulates a packet to 8.8.8.8 and tells you which interface and gateway would be used).
1.2 The Configuration Layer: nmcli
(Persistent)
To make settings permanent, we need a daemon that reads config files and applies them at boot. In modern
Linux (including RHEL/CentOS and many Debian setups), this is NetworkManager. The
command-line tool for this is nmcli.
- Profiles: NetworkManager saves settings as "Connection Profiles" (saved in
/etc/NetworkManager/system-connections/). In traditional Debian/Ubuntu systems without NetworkManager, these are found in/etc/network/interfaces. - Logic: It handles complex logic, like "connect to Wi-Fi X when available, otherwise fall back to Ethernet Y."
- Persistence: Changes made here are written to disk and survive reboots.
Hands-On Example:
Use nmcli to set a static IP, ensuring the server always boots with the same address.
# 1. Modify the connection profile for interface 'eno1'
# Set the IP address and Subnet Mask
nmcli con mod eno1 ipv4.addresses 192.168.1.50/24

# 2. Set the Default Gateway (The router packets go to)
nmcli con mod eno1 ipv4.gateway 192.168.1.1

# 3. Disable DHCP (Method: Manual)
nmcli con mod eno1 ipv4.method manual

# 4. Apply the changes (Bounce the interface)
nmcli con up eno1
IP commands modify the direct kernel state (runtime), whereas nmcli manages persistent connection profiles on disk. Troubleshooting begins at the runtime layer, but fixes must be applied to the configuration layer.
Reflection:
- Why did Linux move away from
ifconfig? - If you set an IP with
ip addr addand then reboot, what happens?
Resources:
2. Network Namespaces (The "Containers" of Networking)
In a standard Linux server, there is one global network stack. There is one routing table, one firewall, and one list of interfaces. This creates a problem for Cloud Providers: The Multi-Tenant Problem.
Understanding Linux Namespaces
A namespace is a fundamental Linux kernel feature that allows the kernel to provide a process with its
own isolated view of global system resources. While there are several types of namespaces—such as
pid (Process IDs), mnt (Mount Points), and user (User
IDs)—our primary focus here is on the Network Namespace (net).
The Network Namespace A Network Namespace provides a completely encapsulated network stack. When a process is placed inside a network namespace, it sees a unique set of:
- Network Interfaces (e.g., its own
eth0andlo). - IP Addresses (which can overlap with other namespaces).
- Routing Tables (its own default gateway).
- Firewall Rules (its own independent
iptableschains).
Even though multiple containers share the same underlying Linux Kernel, this isolation ensures they cannot see or interfere with each other's traffic.
2.1 The "Tenant Problem"
Imagine you are hosting Amazon Web Services. Customer A wants a private network using the IP range
192.168.1.0/24. Customer B also wants to use 192.168.1.0/24. On a
normal OS, you cannot have the same IP address twice. It would cause an IP conflict.
To solve this, we use Namespaces. A Network Namespace is like a parallel universe for networking. It partitions the kernel's network structures. Inside a namespace, you have a completely independent set of interfaces, routes, and firewall rules. Customer A lives in Namespace A, and Customer B lives in Namespace B. They can use identical IP addresses without ever conflicting. This is the fundamental technology behind Docker, KubernetesContainer orchestration platform, and LXCLinux Containers - OS-level virtualization.
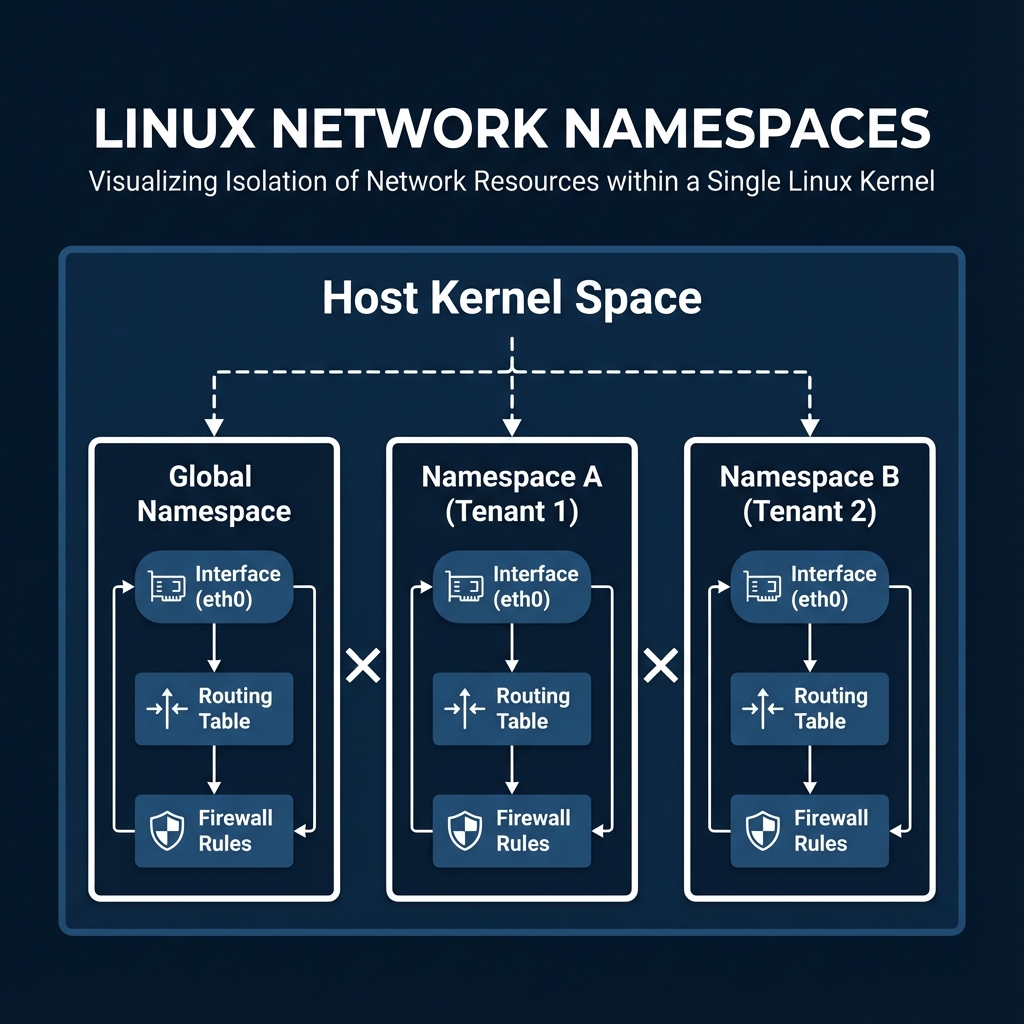 Figure 2.1: Visualizing Isolation of Network Resources within a Single Linux Kernel.
2.2 Hands-On Example
We will create a "sandbox" namespace to demonstrate this total isolation.
# 1. Create a new namespace called "sandbox"
sudo ip netns add sandbox

# 2. Verify Isolation
# Run 'ip link' on the main host. You see all your physical cards.
ip link show

# Run 'ip link' INSIDE the sandbox. You see NOTHING (except loopback).
# The syntax is: ip netns exec <name> <command>
sudo ip netns exec sandbox ip link show

# 3. Activate the Loopback
# Ideally, every network stack needs a standard localhost (127.0.0.1)
sudo ip netns exec sandbox ip link set lo up
Network Namespaces provide total isolation of interfaces, routing tables, and firewalls. This is the core mechanism enabling multi-tenancy and overlapping IP addresses in modern clouds and containers.
Reflection:
- Can a process in Namespace A see the network traffic of Namespace B?
- How does this isolation improve security in a cloud environment?
Resources:
3. Connecting the Dots: Veth Pairs and Bridges
Isolation is excellent for security, but now our namespace is a digital islands. It helps no one if it cannot communicate. We need two things to fix this: a cable and a switch.
3.1 The Virtual Cable (veth)
Veth: The "Virtual Crossover Cable"
A Veth pair (Virtual Ethernet) always comes in two. Whatever goes in one end comes out
the other. It is used to connect two "logic centers" directly. In Linux, this usually means connecting
two different Network Namespaces (like a Docker container to the Host, or two virtual routers to each
other). Think of it as a point-to-point "virtual crossover cable" with no switch in the middle.
Functionality: Packets sent into Interface A instantly arrive at Interface B, and vice versa. This allows us to tunnel traffic from the Global Host namespace into the isolated "sandbox" namespace.
Hands-On Example: Connecting the Sandbox to the Host.
# 1. Create the pair. We name the ends specifically to avoid confusion.
# 'veth-host' will stay on the outside. 'veth-sandbox' will go inside.
sudo ip link add veth-host type veth peer name veth-sandbox

# 2. Move one end through the "portal" into the namespace
sudo ip link set veth-sandbox netns sandbox

# 3. Configure IPs (The Host side is the Gateway; The Sandbox side is the Client)
# Host Side: 10.0.0.1
sudo ip addr add 10.0.0.1/24 dev veth-host
sudo ip link set veth-host up

# Sandbox Side: 10.0.0.2
sudo ip netns exec sandbox ip addr add 10.0.0.2/24 dev veth-sandbox
sudo ip netns exec sandbox ip link set veth-sandbox up

# 4. Test Connectivity
sudo ip netns exec sandbox ping 10.0.0.1
3.2 The Virtual Switch (bridge)
Connecting two points with a veth is easy. But what if you have 50 Containers? You cannot
create a mesh of cables between every single one. You need a device to connect them all to a central
point. A Linux Bridge is a software implementation of a standard Ethernet Switch. It
operates at Layer 2 (Data Link Layer).
TAP: The "Virtual Straight-Through Cable"
A TAP device is designed to connect a User-Space Application (like a QEMU/KVM Virtual
Machine) to the Kernel’s Network Stack. In a physical lab, you use a straight-through cable to connect a
PC to a Switch. In our virtual environment:
- The VM acts like the PC.
- The Linux Bridge (e.g.,
vmbr0) acts like the Switch. - The TAP interface is the cable connecting them.
Simulating an Ethernet Device
In the physical world, your computer has a Network Interface Card (NIC) where you plug in a cable. In
the virtual world, the VM needs to "think" it has a physical NIC. A TAP (Terminal Access Point) device
is a software-based network interface. To the Linux kernel, a TAP device looks and acts exactly like a
physical Ethernet port (like eth0 or enp0s3).
- The VM sees one end of this "cable" as its own hardware.
- The Host OS sees the other end as a network interface it can manage.
Operating at Layer 2 (Data Link Layer)
The "Layer 2" part is the most critical distinction. In the OSI model, Layer 2 deals with Ethernet
frames and MAC addresses. Because a TAP interface operates at Layer 2, it can pass raw Ethernet frames
directly. This means it carries information about MAC addresses, not just IP addresses.
Why this matters for VMs: Because it handles MAC addresses, you can bridge a TAP interface. This allows a VM to:
- Have its own unique MAC address.
- Use DHCP to get an IP address from your physical router.
- Support non-IP protocols (like ARP or certain industrial protocols).
TAP vs. TUN (The Common Comparison)
You will often see TAP mentioned alongside TUN. Here is the difference:
| Feature | TAP | TUN |
|---|---|---|
| OSI Layer | Layer 2 (Data Link) | Layer 3 (Network) |
| Data Unit | Ethernet Frames (includes MAC) | IP Packets |
| Use Case | Virtual Machines, Bridges | VPNs (OpenVPN, WireGuard) |
| Analogy | A virtual Ethernet cable | A virtual point-to-point tunnel |
The Difference: Unlike Veth, which has two "network interface" ends, a TAP device has one "network interface" end (in the kernel) and one "file descriptor" end (which the VM software opens like a file to read/write packets).
| Feature | Veth Pair | TAP Interface |
|---|---|---|
| Analogy | Crossover Cable | Straight-Through Cable |
| Common Use | Containers (Docker/LXC) | Virtual Machines (KVM/QEMU) |
| Structure | Two ends, both are "interfaces" | One interface end + one "software" end |
Figure 3.1: Veth pairs connecting Namespaces to a Linux Bridge.
Example: Manually creating a TAP interface (What ProxmoxOpen-source virtualization platform combining KVM and LXC does behind the scenes)
# 1. Create the TAP interface
sudo ip tuntap add dev tap0 mode tap

# 2. Plug it into the Bridge
sudo ip link set tap0 master br0
sudo ip link set tap0 up
Hands-On Example: Connecting Two Namespaces (Red & Blue) We will act as a "Virtual Switch" administrator. We want to connect two isolated namespaces so they can talk to each other.
-
Create the Bridge (The Switch):
bash sudo ip link add name br0 type bridge sudo ip link set br0 up -
Create the "Computers" (Namespaces):
bash sudo ip netns add red sudo ip netns add blue -
Create the Cables (Veth Pairs): We need two cables. One for Red, one for Blue.
- Cable 1:
veth-red(Switch side) <->veth-red-ns(Computer side) - Cable 2:
veth-blue(Switch side) <->veth-blue-ns(Computer side)bash sudo ip link add veth-red type veth peer name veth-red-ns sudo ip link add veth-blue type veth peer name veth-blue-ns
- Cable 1:
-
Plug them in (Wiring):
- Plug the "NS" ends into the namespaces.
- Plug the other ends into the Bridge (
master br0).
# Wiring Red
sudo ip link set veth-red-ns netns red
sudo ip link set veth-red master br0
sudo ip link set veth-red up

# Wiring Blue
sudo ip link set veth-blue-ns netns blue
sudo ip link set veth-blue master br0
sudo ip link set veth-blue up
- Configure IPs (Inside Namespaces):
# Red Computer: 192.168.50.1
sudo ip netns exec red ip addr add 192.168.50.1/24 dev veth-red-ns
sudo ip netns exec red ip link set veth-red-ns up

# Blue Computer: 192.168.50.2
sudo ip netns exec blue ip addr add 192.168.50.2/24 dev veth-blue-ns
sudo ip netns exec blue ip link set veth-blue-ns up
- Test Connectivity:
Ping Blue from Red. The packet goes:
Red -> veth -> br0 -> veth -> Blue.
sudo ip netns exec red ping -c 3 192.168.50.2
Veth pairs act as virtual crossover cables connecting namespaces, while Linux Bridges function as virtual Layer-2 switches. Together, they allow us to build complex, software-defined network topologies.
Reflection:
- If you forget to "plug" the veth into the bridge (
master br0), what happens? - Why do we need two ends to a veth pair?
Resources:
4. Container Networking in Practice (Docker, Podman, LXCLinux Containers - OS-level virtualization)
In Week 3, we discussed containers. Now we see how they use the Linux networking primitives we just learned.
4.1 Docker (The Standard Bridge): From Manual Plumbing to Automation
When you install Docker, it sets up a permanent "Virtual Switch" on your host machine called
docker0. This bridge acts as the central hub for all containers.
The Architecture of a Container Connection
- The Hub: The Linux Bridge named
docker0(usually assigned the gateway IP172.17.0.1/16). - The Cable: Every time you run
docker run, Docker creates avethpair (Virtual Ethernet).- One end is "plugged" into the
docker0bridge (Host side). - The other end is "teleported" into the container (Namespace side).
- One end is "plugged" into the
- The Room: The container is not a separate machine; it is a standard process living inside a restricted Network Namespace.
Direct CLI Comparison: Manual Linux vs. Docker
This table shows how the complex manual steps you learned in Section 3 are condensed into single Docker
commands.
| Action | Manual Linux Commands (The Hard Way) | Docker Command (The Automated Way) |
|---|---|---|
| Create the Switch | ip link add br0 type bridge |
docker network create my-net |
| Create the Room | ip netns add student-lab |
docker run --name student-lab ... |
| Create the Cable | ip link add veth-h type veth peer veth-c |
(Handled automatically during
run)
|
| Plug into Switch | ip link set veth-h master br0 |
(Handled automatically during
run)
|
| Move to Room | ip link set veth-c netns student-lab |
(Handled automatically during
run)
|
| Add IP Address | ip netns exec student-lab ip addr add ... |
--ip 172.17.0.5 (or via DHCP) |
4.2 Podman (Rootless Networking)
Podman often manages containers without root privileges. Standard bridges require root. How does it work?
- slirp4netns: Podman uses a User-Space networking stack. It "slurps" traffic from the host interface and pipes it into the container namespace without touching the kernel's actual bridge settings.
- Performance: Slightly slower than Docker's bridge, but much more secure.
4.3 LXCLinux Containers - OS-level virtualization (System Containers)
LXCLinux
Containers - OS-level virtualization is closer to ProxmoxOpen-source virtualization
platform combining KVM and LXC's approach. It typically
uses lxcbr0.
- Unlike Docker, LXC networking is defined in a config file. By default, it connects
to
lxcbr0and requests an IP via DHCP, just like a physical computer would.
# 1. Create a container
sudo lxc-create -n my-container -t download -- -d ubuntu -r focal -a amd64


# 2. View the Network Config (How does it get an IP?)
# You will see: lxc .net.0.type = veth
# You will see: lxc .net.0.link = lxcbr0
cat /var/lib/lxc/my-container/config


# 3. Start the container (It creates the veth and asks for DHCP)
sudo lxc-start -n my-container


# 4. Check the assigned IP
sudo lxc-info -n my-container
Modern container platforms automate complex kernel plumbing. Docker uses bridge-based automation, Podman leverages slirp4netns for secure rootless operation, and LXC bridges system containers directly.
Reflection:
- Why is "Rootless" networking considered more secure?
- How does
docker network createsimplify what we did in Section 3?
Resources:
5. Advanced Linux Operations
Mastering the basics is enough to build a lab, but production environments require robustness, redundancy, and security.
5.1 Link Aggregation (Bonding/LACP)
Hardware fails. Cables get cut, SFP modules burn out, and switch ports die. If your Hypervisor is connected via a single cable, you have a Single Point of Failure (SPOF).
Bonding allows you to combine multiple physical interfaces (e.g., eno1 and
eno2) into a single virtual interface (bond0).
- Mode 1 (Active-Backup): Only one cable is used. If it fails, the traffic flips to the second cable. Simple, but wastes 50% bandwidth.
- Mode 4 (802.3ad LACP): The Gold Standard. The server and switch communicate to balance traffic across both cables simultaneously. You get double the speed and redundancy.
Configuration:
# 1. Create the Bond Interface
nmcli con add type bond con-name bond0 ifname bond0 mode 802.3ad
# 2. Enslave Physical NICs to the Bond
nmcli con add type ethernet slave-type bond con-name bond0-eno1 ifname eno1 master bond0
nmcli con add type ethernet slave-type bond con-name bond0-eno2 ifname eno2 master bond0
# 3. Bring up the Bond
nmcli con up bond0
5.2 IP Forwarding & Routing
A Linux server usually behaves like an End Host—it consumes packets sent to it and ignores the rest. However, in virtualization (specifically NAT Mode), the Linux host must act as a Router. It needs to accept packets from VMs and forward them to the Internet.
To do this, we must toggle a specialized kernel parameter: ip_forward. We also need to
manipulate the Routing Table to tell the kernel where networks live.
Commands:
# Check status (0 = Disabled, 1 = Enabled)
cat /proc/sys/net/ipv4/ip_forward


# Enable Forwarding Temporarily
sysctl -w net.ipv4.ip_forward=1


# Add a Static Route
# "Traffic for 10.99.0.0/24 should be sent to the gateway at 192.168.1.254"
sudo ip route add 10.99.0.0/24 via 192.168.1.254
5.3 The Linux Firewall (iptables)
Security in the cloud isn't just about an external firewall appliance. Every Linux kernel has a built-in
firewall called Netfilter. We manipulate it using iptables. It processes
packets in "Chains":
1. INPUT: Filters traffic destined for the localhost.
2. OUTPUT: Filters traffic created by the localhost.
3. FORWARD: Filters traffic passing through the localhost (e.g., VMVirtual Machine -
A software-based emulation of a physical
computer to
Internet traffic).
Hands-On Example: securing a host.
# 1. Allow "Established" traffic
# If we sent a request out, allow the reply back in. Essential!
sudo iptables -A INPUT -m state --state ESTABLISHED,RELATED -j ACCEPT


# 2. Allow SSH (Port 22) so we can manage the server
sudo iptables -A INPUT -p tcp --dport 22 -j ACCEPT


# 3. Drop Everything Else
# This is the "Default Deny" posture. If it's not explicitly allowed, kill it.
sudo iptables -P INPUT DROP
Modern Frontends: firewalld vs iptables
While iptables (and its successor nftables) is the low-level tool, managing
thousands of rules manually is hard. Modern distros use "Frontend Controllers":
- RHEL/CentOS/Fedora: Use
firewalld. It organizes rules into "Zones" (Public, Home, Work).
# 1. Check which zone is active
sudo firewall-cmd --get-active-zones

# 2. Allow HTTP traffic permanently
sudo firewall-cmd --permanent --add-service=http

# 3. Allow a specific port (e.g., 8080)
sudo firewall-cmd --permanent --add-port=8080/tcp

# 4. Reload to apply changes
sudo firewall-cmd --reload
- Debian/Ubuntu: Often use
ufw(Uncomplicated Firewall).
# 1. Check status (Inactive by default)
sudo ufw status

# 2. Allow SSH first (Important!)
sudo ufw allow ssh

# 3. Allow specific ports
sudo ufw allow 80/tcp
sudo ufw allow 8080/tcp

# 4. Enable the firewall
sudo ufw enable
These tools write the underlying iptables/nftables rules for you.
5.4 Network Reconnaissance (ss &
nmap)
Before you can analyze traffic, you often need to know what ports are open or who is listening.
Socket Statistics (ss)
ss is the modern replacement for the deprecated netstat. It allows you to see
which processes on your server are listening for connections.
# Show all Listening (l) TCP (t) and UDP (u) ports with Numeric (n) values and Process names (p)
sudo ss -tulpn
Network Mapper (nmap)
nmap is the industry standard for network discovery. Unlike ss (which looks
locally), nmap allows you to scan remote servers to see what they are exposing.
# Scan a target IP to see open ports
nmap 192.168.1.50
5.5 Traffic Analysis (tcpdump)
When networking breaks, it often fails silently. A firewall drops a packet without an error message. A route sends traffic into a black hole. To fix this, we need Packet Capture.
tcpdump is the CLI version of Wireshark. It puts the network card into "Promiscuous Mode,"
allowing it to see every packet on the wire, not just those addressed to it.
Commands:
# Basic Capture: Listen on interface 'vmbr0' for Port 80 (HTTP)
sudo tcpdump -i vmbr0 port 80

# Source Filtering: Show traffic only from a specific "Bad IP"
sudo tcpdump -i vmbr0 src 10.0.0.5

# File Capture: Save packets to a file for detailed analysis in Wireshark later
sudo tcpdump -i vmbr0 -w crash_report.pcap
Advanced operations like Bonding provide hardware redundancy, while Forwarding and IPTables turn a Linux host into a gateway. Tools like ss, nmap, and tcpdump are essential for verifying and debugging traffic flow.
Reflection:
- If you have a Bond with 2 cables and one is cut, does the server go offline?
- Why do we need
ip_forward=1for NAT?
Resources:
Part 2: Virtual Networking in ProxmoxOpen-source virtualization platform combining KVM and LXC
Now that we have dismantled the Linux kernel concepts, we can look at how ProxmoxOpen-source virtualization platform combining KVM and LXC Virtual Environment (PVE) uses them to manage VMVirtual Machine - A software-based emulation of a physical computer networking. ProxmoxOpen-source virtualization platform combining KVM and LXC does not invent its own networking stack; it "orchestrates" standard Linux tools (Bridges, OVS, IPTables) via a web interface.
6. Open vSwitch (OVS): The Cloud Switch
While the standard Linux Bridge is reliable and simple, it was designed for a single server. It lacks the intelligence required for massive, multi-tenant clouds. Open vSwitch (OVS) is an industrial-grade, programmable virtual switch used by giants like OpenStack platform , Red Hat, and Citrix.
6.1 Architecture: Control Plane vs. Data Plane
Unlike a physical dumb switch, OVS is split into two parts:
1. Userspace (Control Plane): ovs-vswitchd and ovsdb-server
handle the database and logic. This is where you configure "Flows" and "Ports".
2. Kernel Module (Data Plane): This handles the actual packet switching at wire speed.
It caches decisions made by the Control Plane so that future matching packets don't need to check the
database again.
6.2 Installing OVS
Unlike the standard bridge, OVS is not always installed by default.
# Ubuntu/Debian
sudo apt update
sudo apt install openvswitch-switch

# Start the service
sudo systemctl enable --now openvswitch-switch

# Verify
sudo ovs-vsctl show
6.3 The Power of Flows
Standard bridges forward based on MAC addresses. OVS forwards based on Flow Rules. A flow rule matches a packet's header fields and performs an action.
Example Scenario: You want to block a specific "Bad Neighbor" VMVirtual Machine - A software-based emulation of a physical computer (IP 10.0.0.66) from sending traffic, but allow everything else.
- Linux Bridge: Cannot do this natively (needs complex iptables).
- OVS: One simple command.
# 1. Create a programmable bridge
# This creates a virtual switch that listens for OpenFlow commands.
ovs-vsctl add-br ovsbr0

# 2. Add a Flow Rule to DROP traffic from specific source IP
# "If a packet comes from 10.0.0.66, DROP it explicitly."
ovs-ofctl add-flow ovsbr0 "ip,nw_src=10.0.0.66 actions=drop"

# 3. Add a fallback rule (Normal Switching)
# "If no other rules match, behave like a normal L2 Switch."
ovs-ofctl add-flow ovsbr0 "priority=0 actions=NORMAL"
6.4 SDN Controller Integration
OVS is designed to be controlled remotely by an SDN Controller (like OpenDaylight or ONOS). This allows a central brain to program the switches across the entire datacenter.
# Point the switch to a Controller IP
ovs-vsctl set-controller ovsbr0 tcp:192.168.56.10:6653
Open vSwitch (OVS) is the industrial foundation for Software Defined Networking. By separating the Control and Data planes and using flow-based logic, it enables programmable network orchestration at scale.
Reflection:
- How does OVS differ from a standard Linux Bridge?
- What is the role of an SDN Controller?
Resources:
7. ProxmoxOpen-source virtualization platform combining KVM and LXC Networking
ProxmoxOpen-source virtualization platform combining KVM and LXC VE is not a "black box." It is simply a Debian Linux host with a nice web interface. Every networking button you click in the GUI corresponds directly to the Linux commands we learned in Part 1.
| ProxmoxOpen-source virtualization platform combining KVM and LXC GUI Term | Underlying Linux Technology |
|---|---|
Linux Bridge (vmbr0) |
Standard bridge (Section 3.2) |
Bond (bond0) |
Linux Bonding (Section 5.1) |
| VLAN Tag | vlan interface or Bridge VLAN Filtering (Section 7.3)
|
| Firewall | iptables / nftables (Section 5.3) |
When you start a VMVirtual Machine - A software-based emulation of a physical
computer, ProxmoxOpen-source virtualization platform combining KVM and LXC
creates a dynamic
tap interface (e.g., tap100i0) and plugs it into the bridge
(vmbr0), exactly like we plugged in veth pairs in the Lab.
7.1 Networking Modes
When configuring a VMVirtual Machine - A software-based emulation of a physical computer's hardware, you choose how it connects to the bridge. We primarily see three patterns.
Figure 7.1: Comparison of Bridged vs. NAT vs. VLAN Modes.
1. Bridged Mode (Default)
This is the standard configuration for 90% of deployments. The VMVirtual Machine - A software-based emulation of a physical computer becomes a full peer on the physical network.
Packet Flow:
[VM eth0] -> [Host tap100i0] -> [Linux Bridge vmbr0] -> [Physical NIC eno1] -> [Physical Switch]
Detailed Configuration:
In /etc/network/interfaces, a Bridge looks like this:
auto vmbr0
iface vmbr0 inet static
 address 192.168.1.10/24
 gateway 192.168.1.1
 bridge-ports eno1 # This links the bridge to the physical cable
 bridge-stp off


 bridge-fd 0
Implication:
- DHCP: The VMVirtual Machine - A software-based emulation of a physical
computer sends a broadcast
DISCOVERpacket. It traverses the bridge, hits the physical wire, and reaches your office router. The router assigns an IP directly to the VMVirtual Machine - A software-based emulation of a physical computer. - Visibility: Every device on your LAN can ping the VMVirtual Machine - A software-based emulation of a physical computer.
2. NAT Mode (Network Address Translation)
Sometimes you cannot get extra public IPs (e.g., in a data center giving you only 1 IP). You need to create a private network inside the host and share the single public IP.
Packet Flow:
[VMVirtual Machine - A software-based emulation of a physical
                            computer eth0] -> [Host tap100i0] -> [Private Bridge vmbr1] -> [Host Routing/NAT] -> [Physical NIC eno1] -> Internet
Detailed Configuration:
This mode requires Masquerading (Source NAT) in iptables.
# In /etc/network/interfaces

# 2. Masquerade traffic leaving the physical interface (eno1)
# "If traffic comes from 10.10.10.0/24, replace Source IP with Host IP"
post-up iptables -t nat -A POSTROUTING -s 10.10.10.0/24 -o eno1 -j MASQUERADE
post-down iptables -t nat -D POSTROUTING -s 10.10.10.0/24 -o eno1 -j MASQUERADE
3. VLAN Tagging (802.1Q)
VLANs allow multiple logical networks to share one physical cable. To do this, we insert a 4-byte "Tag" into the Ethernet Frame Header.
Processing Flow:
-
Ingress (VMVirtual Machine - A software-based emulation of a physical computer -> Host):
The VMVirtual Machine - A software-based emulation of a physical computer sends a standard "untagged" packet. -
Tagging:
As the packet enters the bridge port (configured withtag=20), ProxmoxOpen-source virtualization platform combining KVM and LXC inserts the VLAN ID 20. -
Transit:
The bridge sees the packet belongs to VLAN 20 and forwards it only to ports that are members of VLAN 20 (including the uplink).
3.1 Configuring VLANs manually (Linux CLI):
You can create VLAN interfaces on standard Linux without a bridge using the ip command. This
creates a virtual interface that automatically tags/untags packets.
# Create a VLAN 10 interface on top of eno1
# Packets sent to 'eno1.10' will leave physical 'eno1' with Tag 10.
sudo ip link add link eno1 name eno1.10 type vlan id 10
sudo ip addr add 192.168.10.1/24 dev eno1.10
sudo ip link set eno1.10 up
Egress (Host -> Switch): The packet leaves eno1 with the tag attached.
The physical switch reads "20" and puts it in the correct broadcast domain.
VLAN Aware Bridge:
Modern ProxmoxOpen-source virtualization platform combining KVM and LXC
uses "VLAN Aware" bridges. Instead of
creating vmbr0.10, vmbr0.20, etc., you toggle
bridge-vlan-aware yes. The bridge then acts like a "Trunk Port", capable of carrying all
VLANs simultaneously.
Proxmox orchestrates standard Linux primitives. Bridged mode provides LAN transparency, NAT mode isolates VMs behind the host, and VLAN tagging enables logical multi-tenancy over shared wires.
Reflection:
- If you are in a Data Center with only 1 Public IP, which mode MUST you use?
- How does a switch know which VLAN a packet belongs to?
Resources:
8. Additional Resources
- Linux Bonding Guide: Red Hat Documentation
- Tcpdump Cheat Sheet: PacketLife
- ProxmoxOpen-source virtualization platform combining KVM and LXC Networking: Official Wiki
9. Lab Exercises
- Lab 1: Linux Networking
- Goal: Hands-on with ip commands, bridges, and routing.
- Lab 2: Proxmox Networking
- Goal: Configuring Bridges, Bonds, and VLANs in ProxmoxOpen-source virtualization platform combining KVM and LXC VE.
Test Your Knowledge
Ready to check your understanding of this week's material? Take the interactive quiz now!
Start Quiz